| HOW TO EDIT
TREES IN BATTLEFIELD: 1942
Updated: October 11th 2003
|
| In
this tutorial, you will learn how to modify models for Battlefield
Models
for Battlefield are stored primarily in the standardMesh.rfa
archive. The two major formats in use are .sm and .tm.
Tools to import and export Battlefield models were included
with the Battlefield mod developer's kit. The tools are
written for 3D Studio Max version 5.1
Requirements:
- You have already completed the tutorial on creating a
mod with the Mod Wizard.
- You own a copy of 3D Studio Max 5.1 or higher. |
| |
1.
|
Install
the 3dsmax toolset from the mod developer's kit by running
the 3dsmax toolset installer program. |
| 2. |
Load
up 3dsmax and you will find a new menu named "Battlefield
Tools", choose RFA Tools from the Battlefield Tools menu.
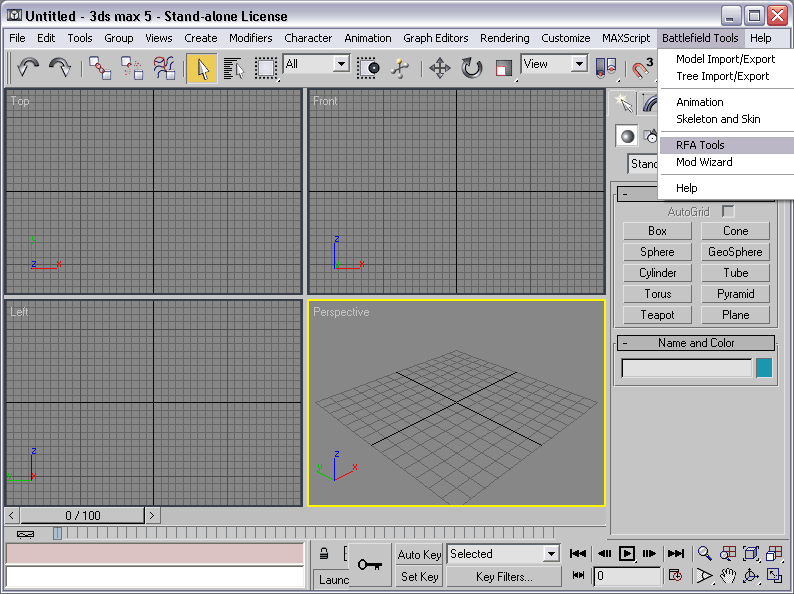
|
| 3. |
Choose
Open .rfa from the File menu
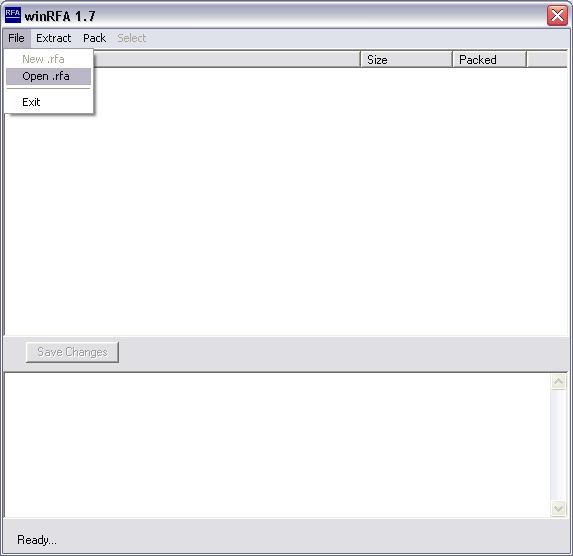
|
| 4. |
Browse
to the /mods/bf1942 folder. The "bf1942" folder has Battlefield's
data files for a normal game.
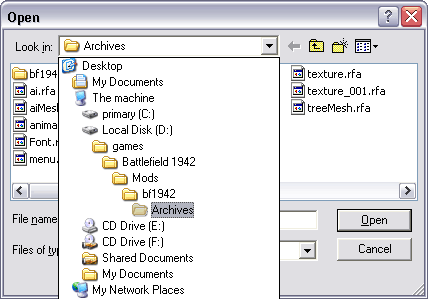
|
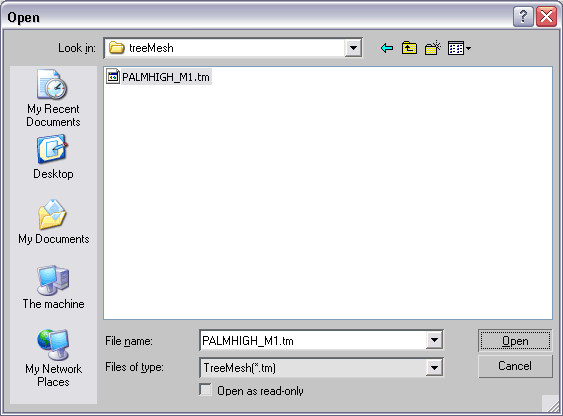
| 5. |
Choose "treeMesh.rfa" and
press Open.
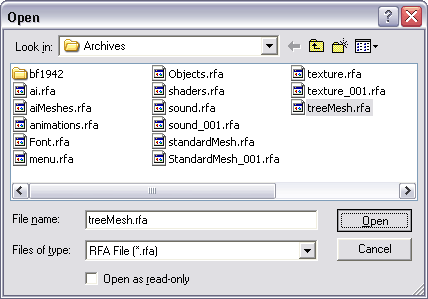
|
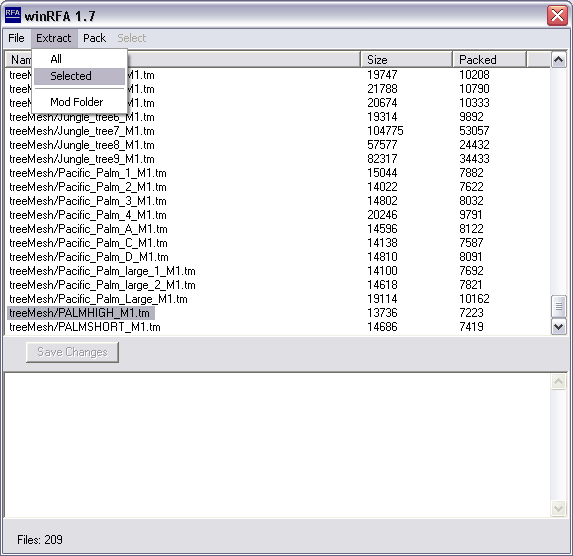
| 6. |
Select
the file PALMHIGH_M1.tm. This file is of a tree used frequrently
on the Wake Island map. From the Extract menu choose Selected.
|
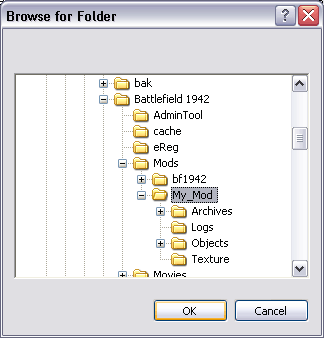
| 7. |
Select
the My_Mod folder in the Browse for Folder dialog and press
OK.
|
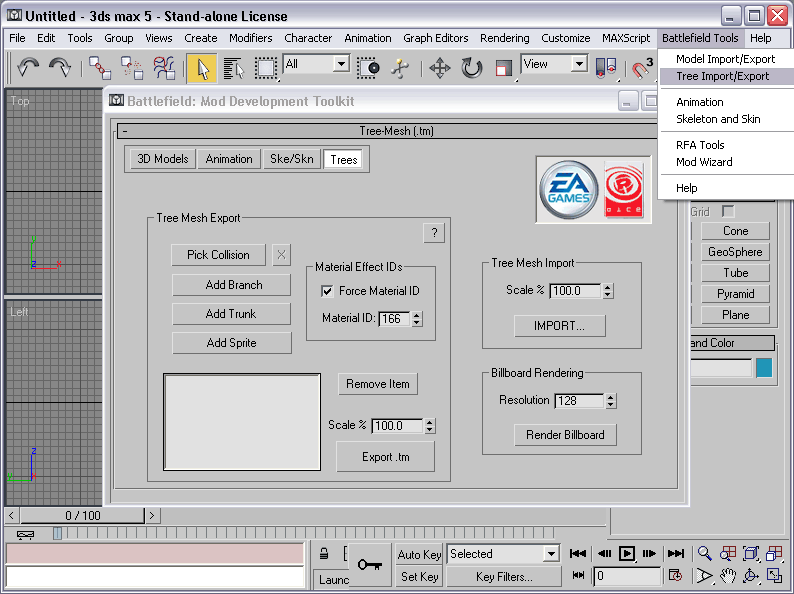
| 8. |
In
3dsmax choose Tree Import/Export from the Battlefield Tools
menu
|
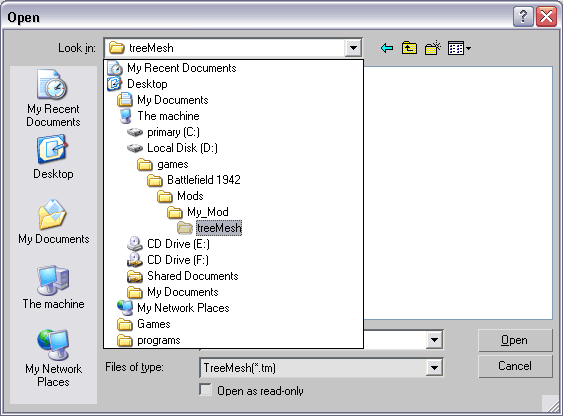
| 9. |
Press
the IMPORT... button under TreeMesh Import and browse to
/My_Mod/TreeMesh/
|
| 10. |
Select "PALMHIGH_M1.tm" and
press Open
|
| 11. |
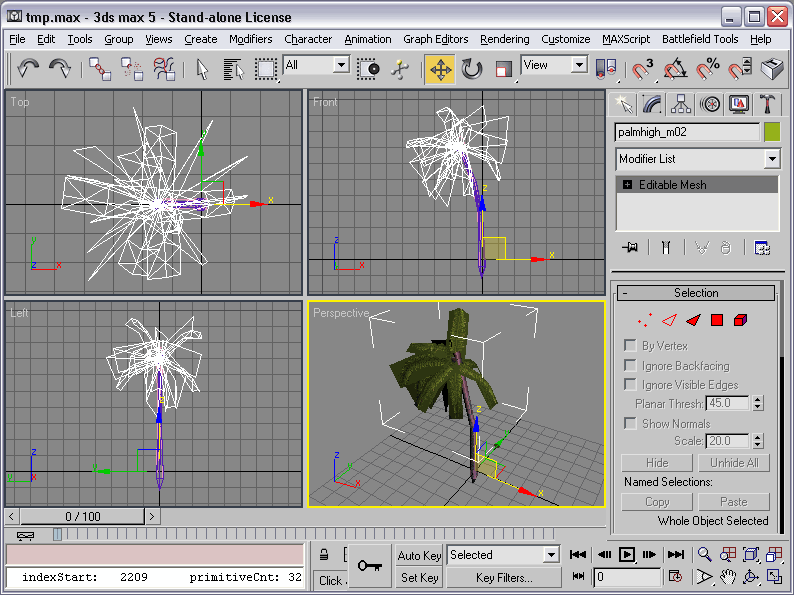
Here
is how the model looks imported into 3dsmax.
|
| 12. |
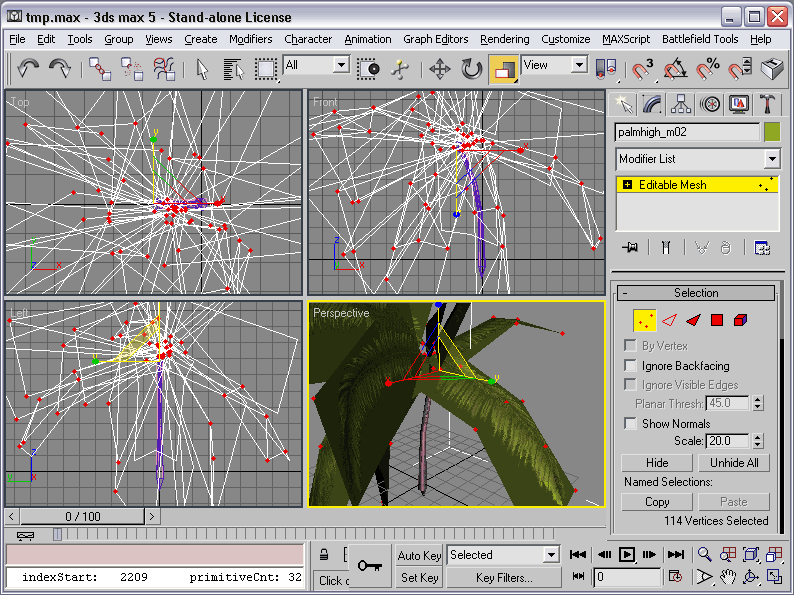
Set
modify mode and sub object vertex on the palmhigh_m02 object.
Then use the selection and scale too to deform the mesh
into an odd shape. This is so we can see that we have changed
the model in game.
|
| 13. |
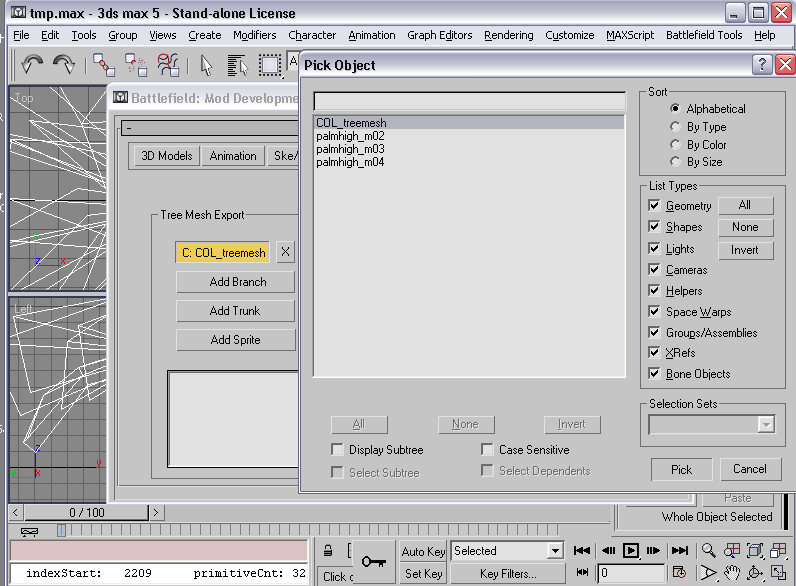
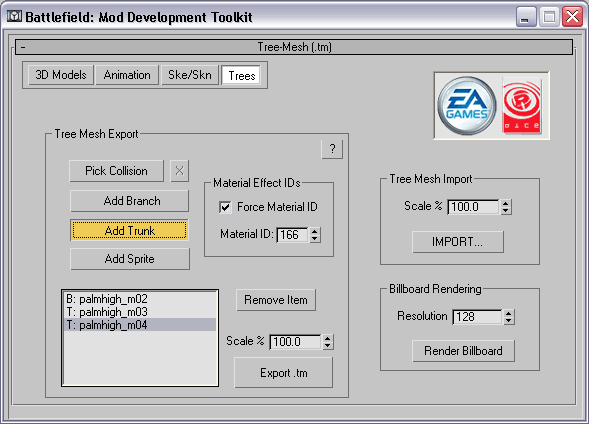
Goto
the export treemesh screen from Battlefield Tools. Press
Pick Collision and pick COL_treemesh as your collision model.
|
| 14. |
Press
Add Branch and pick palmhigh_m02. This geometry will be
rendered as a tree branch with its transparency effects.
Press Add Trunk and pick palmhigh_m03 and Add Trunk palmhigh_m04.
This trunk geometry will be rendered as regular geometry.
Take note that you can have only one material per object
with the current treemesh export version.
Have Force Material ID checked and set to Material ID 166,
you can find more values to use by either importing existing
.tm files or looking in the /bf1942/game/ archive folders
and then at .con files material in their names.
Press
Export .tm and choose the existing file named "PALMHIGH_M1.tm"
|
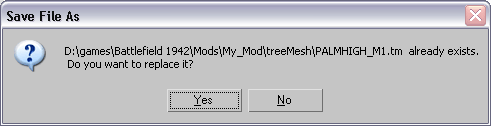
| 15. |
Press
yes to the dialog box that pops up to overwrite the existing
file
|
| 16. |
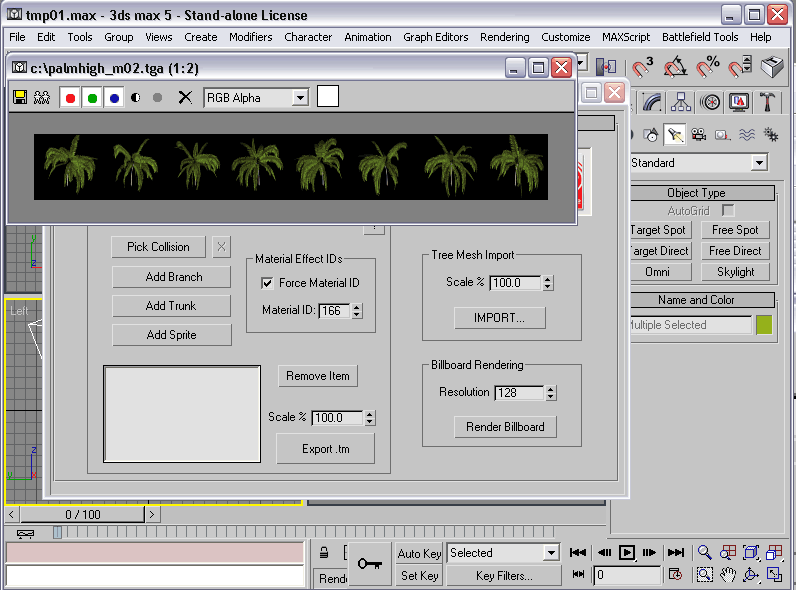
We
are going to render the billboard for the modified tree.
To do this select palmhigh_m02, palmhigh_m03 and palmhigh_m04
then press Render Billboard with the spinner value of 128
for the image resolution. If you want to, you can create
your own lights but if no lights are found in the scene,
the exporter will create a default set for you.
If
you are using alpha channels for transparency then you want
to have the opacity map in the material set to the same
texture only with the alpha channel set (see 3dsmax user
refernce for how to setup an opacity map). It should also
be noted that the .dds plugin for 3dsmax that was used for
this tutorial did not support reading of alpha channels.
Converting the .dds to a 32bit .tga file worked around this
issue. All this is necessary if you wish to have a billboard
rendered with proper transparency for parts of the treemesh
that use alpha channels for transparency.
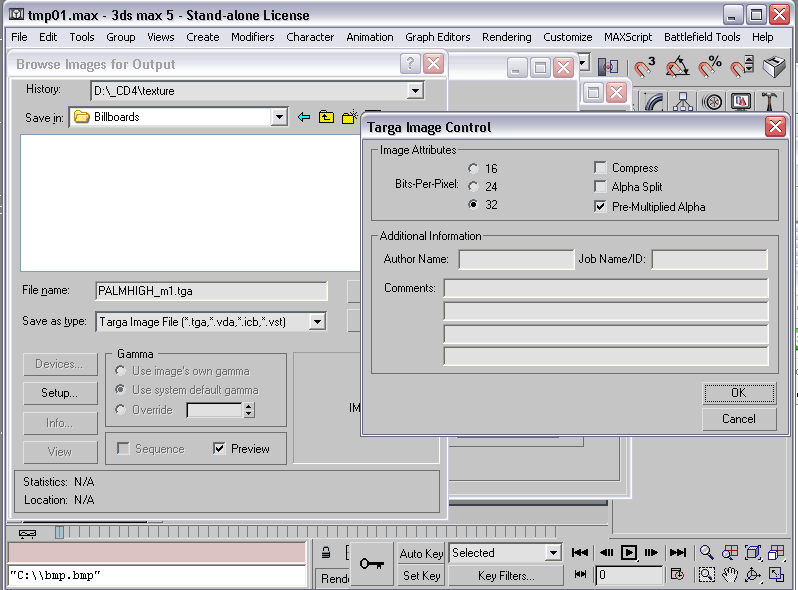
Press
the Save Bitmap button on the rendered image dialog.
|
| 17. |
Create
a subdirectory named Billboards inside /My_Mod/treeMesh/
and save the image with the same name as the treemesh
you
exported. Here we use "PALMHIGH_m1.tga". Use 32bit with
alpha channel and save as a .tga (targa).
|
| 18. |
Convert
the .tga file to a .dds (DXT 5) texture then delete the .tga
file |
| 19. |
In
/my_mod/archives/ run PackRfa.exe, select treeMesh from
the folder drop down list and press the Pack Folder button.

|
| 20. |
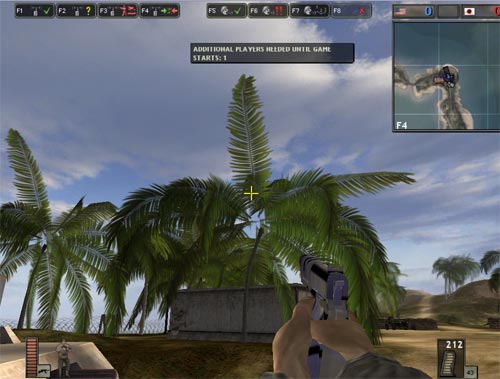
Here
is how the new model looks in game:
|
| |
|
| |
--
End of Tutorial -- |